Tuesday, November 13, 2012

pumpkin spice latte

pleasant pumpkin pleasure.

Fall is coming to an end and that means that its out with the pumpkins and in with the peppermint.  Stores were already stocking their shelves with Christmas gear before Halloween had even happened and then day after it was like it had never even happened!  I'd say its too much too fast.  We should enjoy the small breaks between all the bustling holidays so it's more exciting when they finally arrive, well that's what I think anyways.  As much as I love the Christmas and holiday season I'm not finished enjoying all the autumn amenities... not to say that I've already decided to crank up the Christmas tunes starting next week, or maybe earlier...


Well. If you're like me and love autumn for all it is, and love pumpkin for all it is, and don't love Starbucks because you can't afford it and because the day you decide you want to splurge they are all out of pumpkin spice latte syrup, this treat is right up your alley!


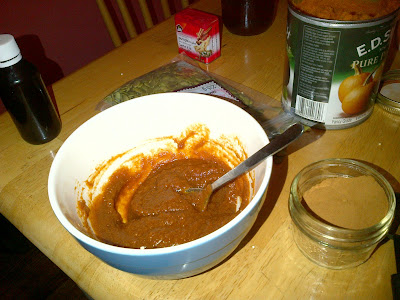
I have to say that this treat is much more rich and savory than its Starbucks sibling because this one is made with REAL ACTUAL PUMPKIN!

pumpkin spice latte:

Serves 1.

- ¾ cup milk (almond milk is great in it as well!) 
- ¼ cup strong coffee or one shot espresso
- 2 - 3 tbsp pure pumpkin puree
- 2 tsp sugar or 1 packet splenda
- ½ - 1 tsp pumpkin pie spice
- ½ -1 tsp cinnamon
- ½ vanilla extract

* almond milk gives it a great extra something! The only difference is that almond milk's flavour is more powerful so you may want to use closer to the larger portion of pumpkin and spices. I'm sure vanilla almond milk would taste amazing as well!

Make your coffee.  In a small saucepan combine milk, pumpkin, spices, and sweetness over medium heat.  Bring to a boil.  Remove from heat and stir in the vanilla.  Add milky spicy pumpkin mixture to coffee.  Stir.  Top with whipped cream. Sprinkle with pumpkin pie spice.  ENJOY!

 a healthful hint:
Coffee is loaded with antioxidants, which we all know are great at fighting free-radicals in your body to keep you healthy and happy! Studies have also shown that coffee-drinkers have a decreased risk of developing type 2 diabetes because it contains minerals such as magnesium and chromium which help your body use insulin which is needed to regulate blood sugar.  There have also been findings that coffee-drinkers also have a decreased risk of Parkinson's disease and dementia.  These benefits are attributed to the coffee itself because they can be seen in both caffeinated and decaffeinated coffees and caffeine doesn't present health concerns if it is consumed in moderation.  The pumpkin is loaded with vitamin C and A, the milk with calcium, and cinnamon boosts your metabolism What better way to start your day?

Let me know what you think of this compared to the one at Starbucks! 

Monday, October 1, 2012

crunchy pumpkin granola

a simple citrouille specialty.


Autumn.  The perfect mix of sweet and savory.  You simply get the best of everything at this time of year.  The sweet end of summer still keeping your toes warm eases into the first crisp of winter that starts to tingle your nose.  Pleasnt pastel dresses meant to cool you down thicken to sweaters with toasted hues to keep you warm.  Orders of refreshing iced teas change to fragrant spiced teas.  The green leaves even take their time changing to shades of auburn and yellow.  Its a transition from one extreme to the next and everything in between is fair game, SO there is no need for permanent change quite yet.  You don't need to keep your winter jacket out yet because you probably won't need it tomorrow and you don't need to put your shorts away because yesterday you were sweating in your corduroy pants.  A perfect time for someone as indecisive as myself...

BUT if you're constantly trying to decide what to eat, the best part about this season might be that there is no line between dinner and dessert!


Sweet potato, butternut squash, pumpkin, cranberries, apples all the fruits and vegetables that anyone cares about that are harevsted at this time of year can be swung either way.  Sweet or savory.

crunchy pumkin granola:

1½ cups plain rolled oats
¼ cups uncooked quinoa, rinsed and dried
¼ cup of pepitas/pumpkin seeds
¼ cup pure pumpkin purée
¼ cup pure maple syrup
½ tsp vanilla extract
½ tsp oil
½ - 1 tsp cinnamon
½ - 1 tsp pumpkin pie spice
tsp salt

*be sure to use pure pumpkin and NOT pumpkin pie filling
*feel free to add as much spice as you want, I'm a fiend for cinnamon so I added more towards the latter end of that scale... and pumpkin pie spice is an equal mixtue of cinnamon, nutmeg, ginger and allspice so you can probably guess how much I put in mine.

Preheat oven to 325° F.  Rinse and dry quinoa.  Evenly spread quinoa and oats on a baking sheet lined with parchment paper.  Toast for about 5 minutes, stir, toast for about 5 more minutes.  Remove from the oven and transfer to a bowl.  Add pepitas.  Reduce oven heat to 300° F.


Now, for the hard part.  In a separate bowl combine the pumpkin purée, maple syrup, vanilla, oil, cinnamon and pumpkin pie spice.  Stir well.  

You think that sounds pretty easy, don't you?  Well, in some respect you would be correct... it is extremely easy to simply stir these ingredients together.  However, that is only if you can ignore the smell of this delicious concoction for long enough not to dip your finger in and TASTE IT!  Once you've opened that door... well, I wish you the best of luck completing this recipe.

Pour pumpkin mixture into the oats, quinoa, and pepita bowl.  Stir until everything is coated.  Spread evenly on the baking sheet again.   Bake for 20 - 30 minutes or until golden.  Stir every 5 - 10 minutes.  Remove from oven and let cool.  ENJOY!  Once cool, transfer into an airtight container.  ENJOY LATER!


I just couldn't get enough of that sweet pumpkin mixture so I whipped up some more with my leftover pumpkin purée.  I didn't do any measurements but I didn't add as much maple syrup this time because I figured I'd be eating it in larger servings... Make it however you want, put it in an airtight container and refridgerate for later.  

Breakfast idea:
Warm it up in the microwave, plop it on some yogurt and sprinkle some granola on top.  Throw some craisins, raisins, pecans, any nuts or seeds you have in there too! 


a healthful hint:

Pumpkin is a delicious vegetable that is low in carbohydrates but high in vitamins! It has one of the highest levels of vitamin A which is important for maintaining the integrity of mucous membranes which work as barriers to protect you from infection while also boosting your immune system. It also combines with the protein opsin to allow proper function of photoreceptors in your retina so you can see in dark or dim light. As you can tell but its colour, pumpkn is loaded with beta-carotene (which convert to vitamin A) and anti-oxidants that work to fight off free radicals that are related to macular degeneration and joint diseases like arthritis. Not only does the flesh have great nutritional benefits, its seeds do too! Pepitas are a great source of tryptophan that gets converted to serotonin which can reduce depression, and zinc which is important for immune reactions of blood cells and bone formation.  These little seeds are also packed with protein, fibre, iron, and phytosterols which are good fats that promote excretion and inhibit absoroption of cholestrol!


Friday, September 7, 2012

jello shooters

citrus celebration slices.


Everyone loves jello shots.  Everyone hates shooting them. Having to suck, slurp, and stick your tongue all up in those stupid little cups.  Such a cute idea at first. Colourful, delcious, jiggly shots that mask the alcohol flavour perfectly turns you into a disugusting, drooling dog-like creature trying to get every last drop. Anyways!  This version is cuter in presentation and participation.  

citrus slice jello shooters:
- 1 package of jello
- 1 cup of citrus vodka
- ¾ hot water 
- ¼ cup fresh squeezed fruit juice
- citrus fruit to match,  emptied peels

*we got creative and made three different jello batches with different combinations of flavours but these instructions are for just ONE batch.

Cut fruit of choice in half. Carefully scoop out contents of halved fruit and put them in a separate bowl.  Squeeze and strain the fruit flesh so you are just left with juice. Boil water. Mix jello powder with ¾ cup of water, 1 cup of vodka and ¼ cup of your fresh juice. Stir until all powder is dissolved. Fill fruit halves and put them in the fridge to set.  Once set, carefully slice the halves into wedges. Serve immediately. Enjoy!


Some of ours melted. The lime ones were perfect though! AND verrrrrry limey. The recipe posted was the one we used for the lime ones.  With the other fruits we used MORE fruit juice (½ cup juice and ½ cup water).  We also had them sitting out of the fridge for a really long time on a very warm summer evening, so that definitely didn't help! SO just don't do either of those things. The juice definitely made them more delicious BUT if you want to play it safe just omit the juice completely and stick to 1 cup water and 1 cup vodka.

My best friend and I made these and popped some candles in to celebrate our friend's birthday and the end of a sweet summer. Make them, share them, and shoot them with friends!


a healthful hint:
You get a sweet serving of vitamin C from all the citrus fruit along with some stress relief and a goooood night  from the alcohol.  BUT that's probably the only healthful thing about these treats. I'd say they're still allowed in this nook because they're nourishing for... the soul.  We'll just stick with that!


Friday, August 31, 2012

pistachio nut butter

a perfect pistachio purée.

There's more out there then just peanut butter? Uhm, YES. This is a most delicious option for your toast! Get excited.  Those with arachibutyrophobia, BEWARE: this is much stickier than peanut butter.


Making your own nut butter is so, so, so simple.  Pick a nut, throw it in an electrical device and BAM, a toast topper!  I picked pistachios... mmm.  I found that pistachios taste excellent alongside, crushed on top and all up in fresh figs.  So when I was working through my surplus of fresh figs a couple weeks ago, I found myself munching many precious pistachios as well.  I just couldn't get enough of them.  Roasted, salted, crumbled on and in yogurt, granola, figs.  It just wasn't enough.  I wanted them on my TOAST.  So I decided the best way to achieve that was to SPREAD THEM.  I had tried making my own almond butter before...which failed.  BUT this time I learned the trick to making homemade nut butter...these perfect pistachios taught me patience.

pistachio nut butter:
- 1 cup of pistachios, roasted or raw, salted or unsalted

*use as many pistachios as you want depending on how much pistachio butter you`d like to enjoy. You could add salt if you want, I didn`t add any because I used salted pistachios. Its all up to you! I also suggest you buy pistachios that have already been shelled or you`ll end up with sore fingers and a big mess to clean up.

Put pistachios in device of your choice.  Let the machine do its work.  Pulse if you want.  BE PATIENT.  Use a spatula to scrape it off the sides constantly.  It will get crumbly looking.  It will be dry looking.  Just WAIT.  It will get clumpy looking.  It will form into a blob.  JUST WAIT.  It will eventually turn to a smooth, shiny, creamy, oily, spreadable substance that looks like it should.  It took about 10 minutes.  Scoop it all out of your device into a cute container.  ENJOY.

I ended up dirtying three different chopping, blending, processing devices.  The chopper thingy that is in the picture, a blender AND a food processor.  This is what I found out: the blender was too big and the blades were too small, it would just throw the blob against the sides instantly and didn't do its job of blending the nuts. The food processor worked well to get the pistachios to the dry clumpy formation, and chopper was taking a long time to get it smooth and it kept getting stuck underneath the blades at first.  If you use a bigger amount of pistachios the food processor would be best, for smaller amounts I'd say definitely use the chopper.  Make sure you stop the device and scrape down the sides constantly to keep the pistachio substance flowing.


Yes.  This will make your breakfast look like a ogre.  Shiny, green, smooth, orge toast.  Spread some on your toast and drizzle some honey over it... and I mean drizzle! Do NOT smother or cover your pistachio butter with honey or you won't be able to get the full pistachio flavour.  The drizzle just adds a delicious complimentary sweetness!

a healthful hint:
Pistachios make a great snack! Having to shell them slows you down so you don't mindlessly eat too many. BUT don't fret if you do eat too many (which isn't difficult because of their deliciousness) because they are one of the lowest calorie and lowest fat nuts out there!  They still have a high fat content like all nuts, but these fats are mostly unsaturated and good for you!  Pistachios are green and purple coloured because of high lutein and anthocyanin content.  Lutein (the green) is good for you eyes and anthocyanin (the purple) is said to be anti-inflammatory, and preventative of cancer and neurological disease.  These nuts also contain the highest levels of potassium, γ-tocopherol, vitamin K, phytosterols, and xanthophyll carotenoids. Alongside all these vitamins and antioxidants, pistachios are packed with protein and fibre!


Sunday, August 26, 2012

grilled corn, tomato and black bean salad

smokey summer salad.


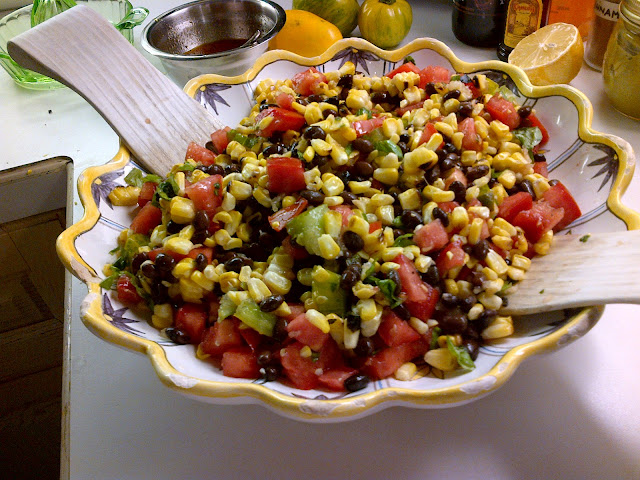
Om nom nom.  This is totally, completely, one hundred percent MY kind of salad.  No leaves.  The only problem I ever have with salads is the boring leaves!  I am not a dinosaur! Or a caterpillar!  Although my friends do tease me about eating like a rabbit but that is because rabbits eat veggies!  They stealthily sneak into gardens on a mission to munch vegetables... no time for the boring leaves.  Sheesh.  BUT this salad is a magnificent medley of Mexican inspired ingredients that you can eat as a side salad or for your main course.  Its sweet and citrusy with a hint of smokey-ness. Mmmmmm.  I must admit I got the idea for this salad from this recipe... I didn't think this up on my own but I did change the dressing slightly AND I can say that this was an excellent dish and a definite must-try!

Serves 4.
for the salad:
- 1 jalepeno pepper, grilled
- 2 cobs corn, grilled
- 3 tomatoes (use red ones to add colour but any will do!)
- 1 cup chopped spanish onion
- 1½ cup canned or cooked black beans, rinsed and drained
- 2 cloves minced garlic
- 3 tbsp fresh chopped basil

for the dressing:
- 3 tbsp extra virgin olive oil 
- 1 tbsp lime juice
- 4 tsp honey
- 1½ tsp sweet paprika (use more, less, or hot paprika depending on your preference)
- salt and black pepper to taste

Brush corn and jalepeno with olive oil. Grill on high for 12 minute. Once corn has some browned kernels and jalepeno skin is charred remove from grill.  Peel jalepeno skin then chop. Slice corn off cob. Dice tomatoes. Chop onion. Chop basil. Mince garlic. Drain and rinse beans. Combine all.  In a seperate bowl make the dressing.  Drizzle dressing over salad. Toss. ENJOY!


*amounts depend on the size of your vegetables, but all are delicious so do not fret!  There was a verrrry minimal amount of spice in this, my sister (who cannot stand any spice) enjoyed it.. so throw another jalepeno in or some hot paprika if you like heat!  Since there are no boring leaves this salad saves well and makes for delicious leftovers!


a healthful hint: 
The beans pack this salad full of protein BUT beans do not contain all the essential amino acids that make up a complete protein for bodily function and uses.  This corn and bean combo is great because corn contains essential amino acids that the beans lack.  Eating these together adds their amino acids to give your body all the essentials it needs!  Its also a good idea to use extra virgin olive oil when cooking. or in this case grilling at high heats.  It takes a higher heat to cause this oil to break down and smoke which can cause it to become carcinogenic and lead to negative health effects.

Wednesday, August 15, 2012

fig, ricotta and honey toast

food for fig fanatics.


I had never even tried a fresh fig until this summer.  As a child I would obliviously eat Fig Newtons without the slightest clue as to what that funny brown stuff in the middle was.  I ate too many at one point in time, got bored of them and haven't had one since.  BUT I started thinking about fresh figs at the very start of summer.  I didn't even know they were a summer fruit and when I could expect to find them.  I just had an extreme and mysterious curiosity, urge, CRAVING!  Figs were the forbidden fruit! ...until late July that is, then BAM! ffffiiiigggsssss, finally in season. Yum.  An immediate fruit favourite for me and I just cannot stop gobbling them up.

So I had some and wanted to do something extraordinary and came across this recipe idea.

fig, ricotta and honey toast:
- rye bread, toasted (or just something that gets crunchy like ciabatta would be yummy as well)
- ricotta
- salt and pepper to taste (a little saltier is great to compliment the sweetness)
- fresh thyme
- figs, sliced
- honey, drizzled 

*use quantities of each ingredient to your own desire!

Toast bread.  Spread ricotta generously.  Add salt and pepper on top of the cheese.  Sprinkle some fresh thyme leaves.  Cut figs into halves or thick slices.  Drizzle with honey and sprinkle a pinch more salt on top if you please. ENJOY!

a healthful hint:
Figs are a fibre-filled fruit, great for maintaining regular bowel function and clean colons!  They are also richer in iron than many fruits which is important for oxygen transport in the blood. In addition to iron, figs by weight have more potassium than bananas and more calcium than a glass of milk!  SO paired with the light ricotta cheese (which keeps this combination low in fat and calories) you have a beautiful bone strengthening meal!

Sunday, July 15, 2012

strawberry icebox pie

a saturday strawberry picking spree.


A very early morning, a long drive, a fun-filled adventure and a strawberry filled bucket resulted in this delicious pie.


This pie was the delicious result of a Saturday morning at Whittamore's Farm!  We picked so many fresh Ontario strawberries and couldn't think of a better way to use them all up before they went bad.  So we created a slightly healthified version of Martha Stewart's strawberry icebox pie.  It was a fairly simple pie, definitely easier than the last Martha recipe I slaved away at and not to mention an extra tasty way to enjoy fresh strawberries!


This is the cutest, sweetest, most loving boy I know.  You might want to think about finding yourself one of these once you realize how many strawberries need to be hulled and thinly sliced.  BUT good luck finding one as good as mine.


graham cracker crust:
- 1½ cups graham crumbs
- 4 tbsp margarine or butter
- 2 tbsp brown sugar
- pinch of salt

strawberry glaze:
- 2 cups sliced strawberries
- ¼ - ½ cup water
½ cup sugar
- 1½ tsp slenda
- ¼ tsp cornstach
- ¼ tsp salt

strawberry pie filling:
- 6 cups sliced strawberries
- whole strawberries to garnish
- ½ cup whipping cream to garnish
- 1 tbsp sugar

*the original recipe for this pie calls for quite a bit of sugar and sweetness, especially in addition to the natural sweetness of the fresh strawberries.  SO I used one less tbsp of sugar in the crust,  one less tbsp of sugar in the whipped cream, I used water in the glaze instead of cranberry juice AND I substituted splenda to make up a quarter of the sugar called for in the glaze (1½ tsp splenda = ¼ cup sugar)I must say this pie was more than sweet enough with my adjustments (and I have a huge sweet tooth) and tasted delicious despite the splenda AND you could easily use even less sugar.

I made the graham crust first and the strawberry glaze after while the strawberries were being prepared.  


for the crust:
Preheat oven to 350°F.  Spray or lightly grease a 9-inch pie plate.  Melt and cool margarine.  Combine graham crumbs, sugar, salt and margarine.  Press mixture to cover bottom and sides of pie plate.  Bake 10-12 minute until slightly browned.  Let cool completely.


for the strawberry glaze:
Combine the 2 cups of strawberries, water, sugar, splenda, cornstarch and salt in a pot over medium-high heat.  Mash strawberries gently.  Bring to a boil.  Reduce to a simmer.  Stir frequently until very thick. Remove from heat and let cool slightly.


for the strawberry pie filling:
Stir the 6 cups of fresh strawberries into the glaze pot.  Coat fresh strawberries completely. Pour into the cooled crust.  Refrigerate for 4 hours.  

After your long wait, with an electric hand mixer beat ½ cup of whipping cream and tbsp of sugar (or more depending on your sweet-tooth) until peaks form.  With spatula spread whipped cream over pie.  Leave a border around the edge to show strawberries. Throw a couple whole strawberries on top.  Enjoy!


a healthful hint:
Less sugar overall means less calories and less insulin spike.  When you intake a lot of simple sugars your insulin secretion levels are increased to help transport sugar from your blood to your tissues.  This ends up causing a large decrease of sugar in your blood and a large excess of energy in your tissues.  The sugar decrease in the blood causes fatigue or a "sugar crash" and the excess energy in the tissues ends up being stored as fat.  BUT polyphenol antioxidants in strawberries do help to regulate blood sugar levels which will also reduce this insulin spike.  On another note, use your strawberries as soon as you can and don't cut them until you are ready to use them!  Storage for longer than 2 days allows for major antioxidant and nutrient loss.  Vitamin C can also be destroyed by oxygen so once the berry is cut these nutrient levels start decreasing.  You could easily leave the strawberries whole (especially if they're cute fresh Ontario strawberries) to give you the greastest nutritional benefits AND save time on preparation.  BUT the fact that the majority of the strawberries in this pie are fresh, you'll be getting a nice helping of vitamin C because it hasn't been disrupted by high temperatures!

Wednesday, July 11, 2012

mini frittatas

frittata's for father's day!

If you're an omelette, quiche, frittata or just a plain egg lover like my father... these are for you!


Usually my sister and I go for good old breakfast in bed for father's day but with this meal plan we really had a lot on our plates!  We started the day with a trip to the local fruit markets to pick up a bunch of fresh veg.  On our way home we stumbled across a mulberry tree and picked some delicious fresh mulberries to add to our fabulous spread of fruit!  This is a great recipe that makes a dozen mini frittatas for a fun family morning and not to mention its healthy too!  What better way to greet the day than with a punch of protein and boost of vitamins? 


Makes 12.
mini frittatas:
- 6 whole eggs 
- 8 egg whites
- 2 tbsp grated parmesan cheese
- 2 tbsp milk
- salt and pepper 
- paprika
 

- 1/2 red bell pepper
- 1/2 red onion
- 2 garlic cloves
- 4-5 asparagus
- 6 large spinach leaves
- 8 cherry tomatoes
- 1 bush of brocoli


Preheat oven to 350º F.  Grease or spray cups of a muffin tin.  Whisk whole eggs, egg whites, milk, salt and pepper in a bowl.  Chop all veggies up very small.  Sauté veggies but NOT the tomatoes with 1 tbsp of olive oil.  Half fill each muffin cup with sautéd veggies.  Fill the rest of each cup with the egg mixture.  Pop in the oven for 20-25 minutes.  Keep checking to make sure the tops don't burn.  When ready sprinkle tops with parmesan cheese and paprika.  Turn oven to broil.  Toss them back in for a quick minute to melt cheese.  When finished, let cool slightly and carefully remove from cups.  ENJOY!

*next time I think I'll try using paper muffin cups to line the tray because they were a little difficult to remove


 Serve with bacon, toast, fresh fruit and refreshing drinks.

a healthful hint:
Adding extra egg whites increases the amount of protein in this meal without increasing the fat from the egg yolks.  Although egg yolks are super healthy and jam-packed with essential vitamins and nutrients, they are also full of fat.  Of that fat, lots of it is omega-3 and omega-6 but there is also cholesterol.  SO if you're watching your fat in-take, top up your egg creations with more whites instead.  It is also really good to buy pasteurized liquid egg whites so you don't have to waste any yolks, or keep the yolks in an air-tight container in the fridge for another day!  All the veggies give you a healthy vitamin boost which is enhanced even more by pairing this meal with fresh fruit on the side!


Sunday, July 8, 2012

lazy ladybugs

a cute canapé.

canapé: 
-a cracker or a small, thin piece of bread or toast spread with cheese, meat, or relish and served as an appetizer.
-a small, prepared and usually decorative food, held in the fingers and often eaten in one bite.

I personally am disgusted by the insect itself due to bad experiences during an infestation of them when I was younger.  They were everywhere, in every colour.  Buzzing and biting.  Yuck.  BUT I do have to say they are one thing I find cute out of nature and not alive. 


I made these to take to a barbeque with a bunch of friends. They were super easy and didn't require too much work, but I suggest leaving yourself enough time for artistic detail.  Everything always takes me longer than I anticipate...I ended up being a little late for the barbeque. BUT overall a great appetizer for a lazy guest to bring to any event!

lazy ladybugs:
-cherry or grape tomatoes
-pitted black olives
-cracker
-feta cheese
-baby spinach
-balsamic vinegar
-black pepper
-sesame seeds

*you could use whatever you want!  Any crackers, small slices of bagette or artisan crips which would also be delicious.  Any type of cheese or spread.  Cream cheese, cheddar, mozarella, humus, babganoush.  And of course the leaf is also up to you.  Baby spinach is all I had at the time but arugula, romaine, fresh basil... the possibilities are ENDLESS


So.  Grab a cracker.  Place a thin slice of feta on cracker.  Top feta with baby spinach leaf.  Slice tomato in half lengthwise.  Cut out small triangular sliver to create the wings.  Place atop baby spinach.  Slice olive in half lenghwise, then again widthwise.  Place in front of tomato to create the head.  Spritz with balsamic vinegar.  This adds delicious flavour while also giving the pepper something to stick to on the tomato.  Find large black pepper pieces or cut up pepeprcorns.  Place decoratively on tomato.  Place seasame seeds for eyes.  Enjoy! (with friends)!
I made it to the barbeque finally.  Friends.  Kabobs.  Souvlaki.  Ladybugs.  Homemade cookies.  Bananagrams.

a healthful hint:
I chose Ryvita Rye & Oat Bran crackers because they are a great low calorie, basically non-fat, low sodium cracker that is reasonably high in fibre! The fibre works to make you feel fuller and the fact that its very low in sodium is a good idea since feta cheese is extremely salty BUT you can reduce the sodium in the feta by soaking it in water for a few minutes and then rinsing. Also even full-fat feta is lower in fat than most cheeses and there are low and non-fat options as well while its also an excellent source of calcium!  The tomato on top of all this goodness adds a splash of vitamins A and C, making this an easy, healthy and cute snack!

Saturday, July 7, 2012

lemon meringue tarts

I made these delicious delights for Mother's Day because my mom loooves lemon tarts.  They were absolutely delicious.  They were also absolutely difficult.  I ended up having to ruin the surprise because I needed help from the professional... mommy!


I adapted this recipe from Martha Stewart's Lime Meringue Tarts. All I really did differently was substitute lemon for lime for filling the shells to please my mother. I also doubled the recipe because I decided to spread my love and appreciation to many other mothers. I don't reccommend it. I think it would be easier and they would turn out better if you stick to the single recipe.

I made the lemon curd first to give time for it to cool while preparing the meringue.  Making the meringue allowed for more than enough chill time.  Chill time for the lemon curd that is, the work was definitely far from "chill".

lemon curd:
-4 large egg yolks
-2 whole eggs
-1 tbsp finely grated lemon zest
-1/2 cup fresh lemon juice (about 3 lemons)
-3/4 sugar
-4 tbsp unsalted butter

Separate 4 yolks from whites.  Save the whites, you'll need them for the meringue.  Whisk 4 large yolks and 2 whole eggs together in a bowl.  In a small saucepan combine egg mixture, lemon juice, and sugar.  Cook over medium-low heat stirring constantly for 8-10 minutes or until thick enough to coat the back of your spoon.  Cool slightly.  Strain into a small bowl.  Cut butter into small pieces.  Add butter a piece by piece, stirring to let it melt.  Stir in zest.  Cover and refridgerate until completely cooled.  Now prepare for the hard part!

*the curd was very sweet, if you'd like more tartness don't be afraid to decrease the amount of sugar because 3/4 cup is more than enough, although I'm not sure what this would do to the consistency.

swiss meringue shells:
-4 large egg whites
-1 cup sugar
-1/2 tsp pure vanilla extract 
-pinch of cream of tartar

Fill a medium sized saucepan a fourth full with water.  Bring to a simmer.  In a heat proof bowl of an electric mixer combine egg whites, sugar, and cream of tartar.  Place over (not in) the simmering water.  Whisk constantly for 3-4 minutes until warm and sugar is dissolved.  Beat mixture with an electric mixer.  Start on low speed.  Gradually increase to high speed.  Beat for about 10 minutes until high, stiff, glossy peaks form.  Add vanilla.  Mix until just combined.  Use immediately.

*when it says use immediately, do it.  I think we waited too long to use it/took too long using it that the consistency changed and it was harder to use.  When trying to pipe the meringue, it wouldn't hold its shape.

creating the shells:
Preheat oven to 200°F.  Trace 2-inch circles on parchment paper.  Line baking sheet with the parchment paper with the pencil face-down.  Pipe meringue by spiralling outward from the centre of the circle, making sure to cover the whole bottom of the circle.  Create walls on the circle and decorate with petals to the best of your ability (it's very difficult to make them look like Martha's).  Bake for 20 minutes.  Reduce heat to 150°F.  Bake for about 40-60 minutes  until crisp, dry and still white.  Let cool completely.  Pipe or spoon lemon curd into shells and serve immediately. Enjoy!

*my shells turned out a little chewy and some of them cracked in the oven. I think this was because of the double recipe and waiting too long with the meringue.  BUT they were still delicious!  I also left the unused ones out for longer and they dried out perfectly. Again they were very sweet so omit as much sugar to suit your taste.

Friday, July 6, 2012

egg nests and deviled chicklets.

I'm a little behind, just figuring out this whole alternate universe and am finally entering the blog world.

An EGGcellent Easter Breakfast!

This was just a fun and simple breakfast I made to get in the Easter spirit this year!

egg nests:

-whole eggs separated
-salt
-toast

Preheat an oven or toaster oven to 450°F.  Grab a baking sheet and spray, grease or line with parchment paper. Carefully separate the egg yolk from the white.  Add salt and beat the white with a whisk or an electric hand mixer until fluffy, firm and foamy.  Create a dollop of egg white on the baking sheet, and create a small indent in the top so the chicklet sits comfortably.  Bake in oven for 3-6 minutes until the outside is browned.  Place the nest on toast.

deviled chicklets:

-whole eggs
-salt
-plain greek yogurt or sour cream or mayonaise
-carrot
-pepper corns or raisin

Hard boil your eggs.  Carefully cut the top of the egg off.  Carefully scoop out the yolk.  Combine the yolk with salt and creamy substance of choice in a bowl.  Transfer yolk mixture into a piping bag or regular old plastic bag with a corner snipped off.  Squeeze yolk to fill the egg whites.  Meticulously cut carrots and pepper corns for the beak and eyes.  Carefully put the top of the egg on the chicklet's head.  Rest in egg nests!  Enjoy!

*If using greek yogurt be sure to add a generous amount of salt and a bit of garlic powder to the yolk mixture to ease the tartness.

ALSO...

These nests can also make your regular, routine morning egg slightly more exciting.  To do this, simply slip your egg yolk onto the indentation after baking the egg white nest for 3 minutes.  Pop it back in the oven for about another 3 minutes to warm and cook the yolk slightly.  Slip it on toast.  Enjoy!


*Add parmesan or gruyere cheese when beating the white for a more filling and flavourful meal.